Wednesday, December 16, 2009

Candy Cane and Canvas

Ok.  I apologize ahead of time.  This post is going to be a little lame.  Sorry.  I am just too tired to take pictures of the things I want to blog about, or to come up with something clever to say.  I promise some  good posts are coming in the near future! :)

We haven't done too many Christmas themed art projects, so I decided it was time to do something about that.  Little Man is loving candy canes this year.  When his mom was putting up the tree, he saw a candy cane ornament and started pretending to lick it.  She went out and bought him a few boxes and he eats at least one a day.  So.........we made a candy cane.  It was pretty simple.  I just cut out the shape and colored red where he needed to put the tissue paper.


I didn't make too many stripes because I knew he'd get bored with it.  He tried crumpling up a handful of tissue paper at one time, which didn't work so well either.  He wanted to make the candy cane, but I don't think he was into the method I chose. :)  Turned out cute anyway...  He also observed that it looked like a "J", so we talked about how it was a "J" for baby Jesus. 

Then I had him paint a canvas for his parents as a Christmas gift.  I got a few Christmas type things for him to paint (which we will do soon), but I wanted something that wasn't Christmas related.  K loves his art work and has saved every single piece we've done.  We haven't done anything like this, and I'm sure it's going to get a prominent place to hang!

I had him use a couple of different tools to paint with.  I didn't want it to end up as just one mess of five colors of paint mixed together and looking like a brown blob.  Plus, Little Man loves to use different tools to paint.  He was so into it.  He used a foam paint brush (green), small circle dobber (very pale yellow), thick haired brush (cream), big circle dobber (burgundy), "cheese" shaped sponge (lavender), very small brush (more lavender), and a fork (purple).  I don't know about you, but I'm a fan!

Tuesday, December 15, 2009

Christmas card display

The past few years I've just taped our Christmas cards to the banister in our kitchen.  It was cute enough, but between Christmas cards and birthday cards (for two) I generally ran out of room.

Sure, I could have bought one of those wire card hanger things, but how fun is that?  I've seen a lot of blogs with decorated clothespins for various reasons.  It got me thinking.  This is what I came up with.

First, I bought a pack of clothespins for $1.64 or something like that.  I used some of my Christmas scrapbook paper and mod podged it on to the clothespins.  I painted a few (just because I had the paint out for another project).


Then I used some thumb tacks and attached the ribbon to my laundry room door.


Then I attached the cards

 
I think it will look even better once all the cards start rolling in.
Simple. Cheap. Cute enough

Monday, December 14, 2009

Russian Tea

Man, I feel like I need another weekend just to recuperate from my weekend.  Anyone else feel like that?  My weekend was very busy, but very fun.  I'm hoping to finish up some last minute crafts and our Christmas cards this week.  Then I can relax a little and enjoy our birthdays and Christmas.

For today, I'm just going to give you the Russian Tea recipe I promised.  It actually doesn't taste much like tea, which is just fine by me.  I don't like any kind of tea... except this.

My family has been making this recipe for years.  I remember enjoying a good cup of this stuff as a child.  I've seen other similar recipes that have lemonade mix in them.  I'm not sure what the difference is since I've never tasted that kind.  I'm gonna stick with old faithful!

You will need:

3/4 cup sugar
1 cup Tang
1/4 cup instant tea (plain)
1/2 tsp cinnamon
1/4 tsp ground cloves

Mix it all together!
You will need about 3 teaspoons per cup of hot water.
You may want to add more too taste.
Enjoy!

Sunday, December 13, 2009

Girls Night Cookie Exchange

Last night I hosted my first ever cookie exchange.  It was lots of fun!  I plan on making it a tradition!
We had a small crowd, but that was OK because I have a small house!

Our list of goodies:
Egg Nog
Soda
Hot Chocolate, Russian tea and coffee


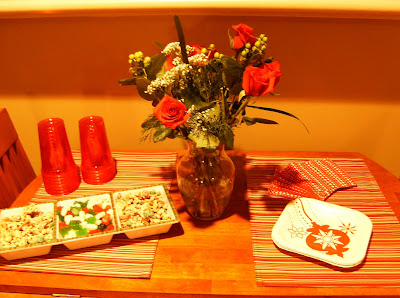
Of course, white trash and some Christmas gummies


veggie pizza

Fruit,
and these yummy brownie/coffee mouse delights

MMMMMMMMMM.....

We ate


We played board games


and we rocked a little Guitar Hero and eventually Rock Band

(I really wish I had a picture of Jen playing the drums!  Good times!)
We also laughed and laughed!

And, obviously, we exchanged cookies...


I made gingerbread cookies.
I got a little razzed about not decorating them, but quite frankly I just did not have the time.
Plus, I'm not a frosting kind of girl anyway.
I think they taste great as is! :)

The recipe is really simple too.  It's not one of those where you use messy molasses or anything like that.  I found it last year on Allrecipes.com and plan on using it every year.

1 (3.5 oz) package cook and serve butterscotch pudding mix
1/2 cup butter
1/2 cup packed brown sugar
1 egg
1 1/2 cups all-purpose flour
1/2 tsp baking soda
1 1/2 tsp ground ginger
1 tsp ground cinnamon

1. In a medium bowl, cream together the dry butterscotch pudding mix, butter, and brown sugar until smooth.  Stir in the egg.  Combine the flour, baking soda, ginger and cinnamon; stir into the pudding mixture.  Cover, and chill dough until firm, about 1 hour.
2. Preheat the oven to 350 degrees.  Grease baking sheets.  On a floured surface, roll dough out to about 1/8 inch thickness, and cut into gingerbread shapes with a cookie cutter.  Place cookies 2 inches apart on the prepared cookie sheets.
3. Bake for 10 to 12 minutes in the preheated oven, until cookies are golden at the edges.  Cool on wire racks.

Saturday, December 12, 2009

Gift Wrapping (Part 2)

Well, besides my husband's gifts... I think I'm finally done wrapping.  I love how they all turned out.  Each one is unique and special.

A few more ideas for you....

We won't see Michael's sister and brother-in-law.  Their gift is going to be shipped to them.
Instead of trying to go all fancy, just to throw it in a post office box and be ruined--I went simple.
I wrapped his sisters gift with yarn.  Plain red yarn.  I told you I'm a fan of the criss cross.
I criss crossed the ribbon all around the gift multiple times.  Then I took the yarn, bundled it in the middle, and tied the gift tag around it.  Simple, yet still cute.


Here's a twist on the multiple bow thing...
Sorry about the picture.  I had to get creative because that wrapping paper is like a straight up mirror.  I was showing up in all the pictures!


Yet another multiple bows gift...
(and yet another picture that proves I need a new camera!)


This next one is for my brother.  I bought a few of those wood stars from Jo Ann's.
I think they were something like 59 and 89 cents.  Not bad. 
That's cheaper than most of the store bought big bows.
Then I painted them with paint I already had.
I used a little glitter paint (that I already had).
And wrote on it with a paint maker (that I already had).
Cheap, easy, but a big statement.


Here's another ornament frame as a label.
I love the ribbon on this one!


I can't take credit for the next one.  I actually saw it in a Martha Stewart catalog and thought it looked neat.
My grandma is one of those people that have everything, or goes out and buys it if she doesn't.
She has made it very clear that if we feel the need to get her something, it should be gift cards.
So that's what I've been getting her the last few years.

Yep.  It's in there.  She's gonna hate it, cuz it's gonna make a mess!! :)
I took some scrapbook paper and shredded it in my shredder.
I already had the jar, so I just filled it up with the shreddings and added the gift card in the middle.
Clever huh?

I think this last one speaks for itself...

It's mini cookie cutters!  Adorable right?
Man, sometimes I just amaze myself! :)

Have fun wrapping!!!!!

Friday, December 11, 2009

White Trash

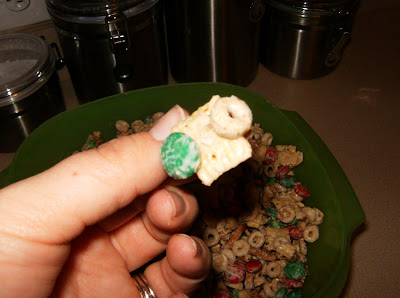
No, I'm not talking down about someone who may or may not be a redneck.  I'm talking about one of the best Christmas treats ever.  My aunt has been making this for years and years, and I have been making it for friends for the last five.  It's always a HUGE hit.  I guess it could also be called Christmas crack.  It's seriously that addicting.  It's super easy to make too.

First, you need a very large bowl.  I bought this bowl just for the annual white trash making.


The line up:
2 cups mini pretzels
5 cups cherrios
5 cups corn chex
2 cups salted peanuts
1 lb M&M's
2 pkgs (12 oz) white chocolate chips
3 tbsp veg. oil

Throw the first five ingredients into the bowl
(I use pretzel sticks and just break them in half)


Put the white chocolate chips in a bowl and mix with 3 T veg. oil

Microwave for 2 minutes and stir.

Then pour over the mix and stir


It will look something like this when done
 

Then spread it out in a thin layer on foil or wax paper


Let it sit for a while and dry.  Then break it up into small pieces. 
I just roll the foil up to help break it.  It keeps my hands clean too. :)


BEWARE, you will end up with a lot!
Like... a large bowl for my cookie exchange party.
And... a bowl to take to my bosses and Little Man.
And... a bowl for Michael to take to work because some random guy at his work is asking about it.
And... a bowl to take to my husband immediately.
And... an extra bag to replenish supplies as needed.

WARNING: This snack WILL be hazardous to your health, but will be so worth it.

Thursday, December 10, 2009

Oh how I love thee... (3)


...let me count the ways.

#3 I love that Michael doesn't yell at me.  In fact, he's never once even raised his voice to me.  Some of you may be thinking, "Well duh.  He shouldn't yell at you."  But let's be real.  This happens in marriages all the time.  I am so thankful that I married someone who treats me with dignity and respect.