Showing posts with label Christmas gifts. Show all posts

Monday, December 26, 2011

Our Christmas

Warning: This post is going to be a little picture heavy and is mostly for the grandparents... but feel free to take a peak if you are interested! :)

Our morning started at 7:15 with Olivia awaking after sleeping 12 straight hours!  Woo hoo!  She is right on the verge of cutting a tooth, so I was expecting her to wake up in pain a few times throughout the night.  Her bottom gums are swollen and you can see the two white lines of the teeth, but they haven't quite poked through yet.  We had a yummy breakfast and then set out to open some gifts!  Michael and I didn't exchange gifts this year, so it was all about Olivia!

I tried to pick some of the best pictures.  I am not looking my prettiest, but that's what Christmas morn is all about. :)  We didn't wrap everything she got.  I didn't want it to be too overwhelming.  We did make sure she had something to open from everyone who sent her a gift.  She had a couple things from most people.

I tried to get a picture of her sitting in front of the tree, but sitting was not on her agenda for today.

So I laid her down and took a picture of her reindeer butt!
She did have socks on, but after kicking them off 3 times I gave up.

One day I want to get matching stockings with our names on them.
It was not in the budget this year. Plus, I couldn't find any I loved.
Then I couldn't find any "O" stockings or even an "O" pin to put on a stocking.
So we went the kiddie route and got a moose stocking. :)
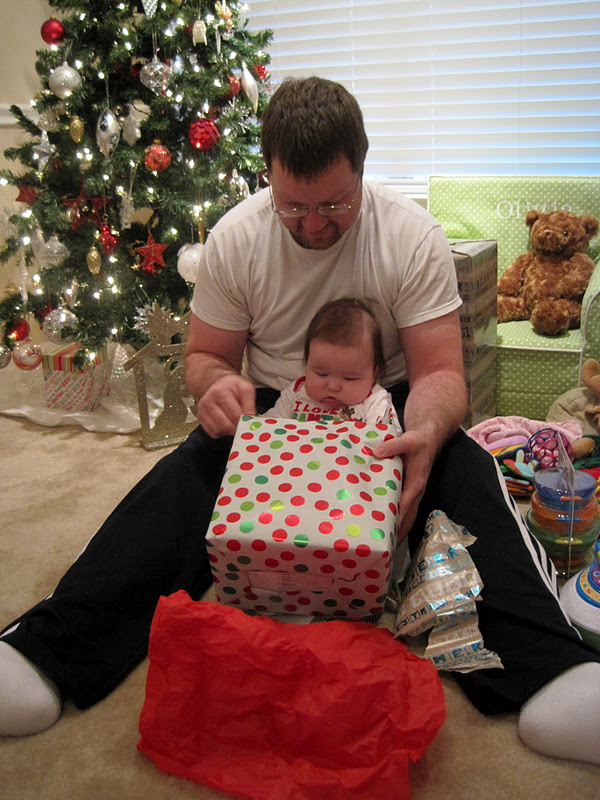
She almost always knows when the camera is on her.  
She was looking at the camera instead of the gift in most of the pictures.

(Look Gramma Kathi-no bow!  Just crazy hair)


She really did rip the paper.
She liked this package because the paper crinkled after she unwrapped it.

She loved the red tissue paper too.
She started getting sleepy.


We had a bit of a rough mid day due to her discomfort.
I think she was having tummy issues on top of teeth issues, but we eventually got it all resolved.

We headed over to our friends John and Alison's house.  Michael went to high school with John.  They ended up moving here just months after us.  It was nice to be able to hang out with them and their family.
Silly girl!

When the teether isn't close by, the fingers will do.

That was our Christmas. We hope you had a great one too.

Wednesday, December 22, 2010

Reindeer Platter

Well, I guess I can tell you now... the reason I have been missing blogs lots of days, and have hardly done any crafts is because of the baby.  I have been worn out and tired most nights and just not in the mood to blog.  Also, the baby has seemed to zap all creative juices right out of me--at least for now.  I have no desire to craft and can't come up with something crafty to do for the life of me.

But... for the sake of Nana and Papa and all things Christmas, I (sort of) pulled something out.  (With some help and inspiration from my friend Laurie!)  Here is Little Man's Christmas gift to Nana and Papa.

I bought a $3 tray from Hobby Lobby
These are the other supplies I used

I went ahead and painted it.  I did it for three reasons... I wanted to save time.  I knew it might get a little complicated.  Lastly, I wanted an even cover so the rest of the project would work.  Call me a cheat.  I don't care.  I'm glad I did, because it was a little complicated.  I gave it two coats.  I maybe could have used a third, but I was ready to move on! :)

First I painted one of Little Man's feet (minus the toes) and put it down.  Then I painted both of the hands to make the antlers.

After it dried we added the details

I wrote Merry Christmas with a paint pen
(sorry, didn't realize when I took it that it was blurry)

When I bought this ribbon to put it on, A) I thought it would go under the face, but I ran out of room, and B) I wasn't planning on keeping the boarder of the tray the red that it was.  It sort of blends in, but is still cute.

I guess I could have got smaller red pom poms.  Apparently I thought Little Man's foot was going to be bigger? :)
That's OK.  Nana and Papa will love it!

Sunday, December 19, 2010

Nativity gift

It is my humble opinion that you cannot have too many nativities at Christmas time.  After all, it's the reason for the season, right?  So this year when it came to making K & G a Christmas gift from Little Man, that is exactly what we did.  I have so much going on right now, that crafting is literally the last thing on my mind.  I feel so uninspired.  My friend Laurie and I went walking the aisle of Hobby Lobby to look for ideas and came across a cute nativity that you paint yourself.  We loved it.  I think it's one of those things that moms and dads (or grandparents) could set up for many Christmases to come.

I forgot to take a picture before I took it out of the plastic, but this is basically all that was on it anyway.
It's a 12 piece set, and we purchased it for 50% off.

I was sort of dreading the painting process.  I felt like it might take days and Little Man would tire of it.  I was wrong!  He LOVED it, and went to town painting it.  We knocked it out in about an hour and a half.

It came with the stable

and 11 little pieces

We started with the stable, because I thought it was going to take us a while.  It really didn't take us too long at all.  Little Man was sooo into it!

Then we moved on to the people and animals 
(He just had to do the animals first... then baby Jesus!)
I did do the faces... mostly just to save time, but also because they were sort of small.  I also did some of the beards.  (Although, I missed Joseph and he now has a blue beard!)

The finished product!
I did fill in some spots here and there, but for the most part I left it.  It's not as detailed or colorful as some others might do, but it's very Little Man and that's the point.

The angel

The shepherd (with one green eye!), the sheep and the donkey

Mary, blue-bearded Joseph, and baby Jesus

One wiseman and a cow

The other two wisemen

Then, when it's time to store it, all the little pieces go inside!

I hope it's something they treasure for years to come!

Wednesday, January 27, 2010

Coasters

Alright.  This is not new.  Everyone in blog land is making these.  Literally.  Everyone.  I didn't want to be left out, so I joined the club.

I made these for my friend Jen.


They are really easy to make too.  Go to your local hardware store and buy some white bath tiles.  Next, take some glue or mod podge and glue on your scrapbook pieces.  Here's what I found... you need to let them dry before you add mod podge to the top.  This will help you avoid the bubbles.  It only took me three times to figure this out! :)  After they dry a little bit, add a layer of mod podge to the top.  I actually added 2 to 3 layers of mod podge.  Think: sweaty drinks are going to be sitting on these.  You want to make sure there is enough of a coat.

Then, to avoid anyone's table from getting scratched, add cork or felt to the bottom of the tile.


I would suggest letting these dry over night before trying to stack them.  After they are dry, stack them up, tie them all cute and give them away.


Along with the coasters, I gave her this cute thing I found...
Cake in a mug

(You can check out the recipe here)


Thursday, December 31, 2009

Scrabble Tile Necklaces

Again, this isn't my own idea.  I think I first saw the idea about a year and a half ago.  It's my understanding that it was floating around bloggy world for a while before that.  It's a super cute and super easy idea, and I've actually made some for myself and given it as gifts multiple times.

This year for Christmas, I made some for my friends Laurie and Amanda.

Here are Laurie's
(sorry, there is a little glare)

 and here are Amanda's


They are rather simple to make.
(I say "rather simple" but this would depend on your crafting skills.
I guess I should say for me they were "rather" simple!)

You will need:
*scrabble tiles
*scrapbook paper
*small stamps and ink (if you choose)
*mod podge
*diamond glaze
*E6000 glue (or something very strong)
*silver bails

The hardest part is finding just the right corner of the paper to fit onto the small scrabble tiles.  I've seen people make little guides to help them, but I just eye ball it and start cutting.  I'm just that kind of crafter.  I don't have time to be making templates! :)  Anyway, find the paper/design you want and cut your paper to fit your tile.  I stamped initials on a few of the ones above.  I've also stamped a little birdy on ones I've made in the past.  You can stamp or you can let the scrapbook paper be the statement.

Adhere the little piece of scrapbook paper onto the tile using the mod podge.  Do a coat of mod podge on the top as well.  Allow this to fully dry before moving on.

After your tile is dry, cover the top with a nice coat of diamond glaze.  Be careful!  This stuff bubbles!

Let this dry completely.  I usually let them sit over night.  Then adhere the bail to the back of the tile using the E6000 glue.  Again, let this dry completely.

There you have it.  A cute little necklace.  NOTE: The bails come in many different forms.  If you want the kind you can just glue on (as opposed to drilling a hole and attaching them), you may have to hunt for them.  I ended up ordering a pack of bails off etsy along with the diamond glaze.  I've heard that is also hard to find in the craft stores these days.  They sell similar items though, so it's up to you.

ALSO-- I made some of these for my boss, but added a little twist.  I had Little Man do so art work and turned it into necklace pieces.  One piece was just a page he painted and the other piece was his handprint.  I scanned them into my computer, printed them down (in color) to just the right size and followed the above mentioned steps to make a very special gift.  K obviously LOVED this, but it was much more work getting the paper to print off the right size.  Just be warned if you want to try this! :)

Tuesday, December 29, 2009

Painted signs

The thing that got me started on homemade gift this year were all the fun signs I had been seeing.  Of course, I saw them and thought "I can do that".  Most of the signs I saw that I liked were made using vinyl, but I wanted to paint them for a more long last looking.  I thought it would be the perfect gift for my mother-in-law.  They are down to earth type of people who have what they need or go out and get it.  I wanted to give something that had a little meaning to it.  Well, out of that started a homemade gift/crafting frenzie.

This is for Michael's mom and her husband Bob

a different view with the flash off...


Then I saw an idea with an "H" like this, and decided to make one for my mom and her husband Ken

 and another view without the flash...

You can't tell in the picture, but some of the paint is shimmery.

I thought that was going to bit it.
Let's be honest.  That was already a lot of work to paint those by hand.
BUT... I was shopping with my sister for her new house and we were looking at things to put in her entryway.
We had looked at a few signs and then I said, "or I could just make you one".
You should have seen her reaction.
I can't even type it.
She practically jumped out of her skin and said, "Yeah, you could"
Like she couldn't believe I was leaving her out this whole time and she was pleased the idea finally "dawned" on me.

SO... I made her a sign too.

I went with more subtle colors for her.
She wants to paint her entry way and I didn't want my sign to class.
The words are a green and the fancy lettering is a bronze.
The white scrolly stuff was suppose to just be a glaze, but it turned out a little darker.
However, in different light you can't hardly see it, so I just left it.