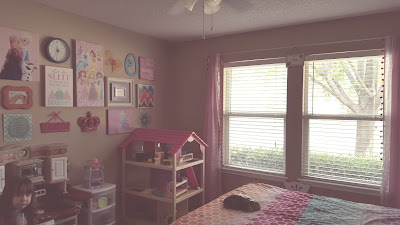
I finally got around to taking some pictures of Olivia's room!
When we found out we were moving, we decided to go ahead and make the switch from toddler bed to big girl bed. In doing so, that meant we needed new bedding and bedroom decor. Since she's into princesses, that is the route we went. I didn't want to pick just one princess, because she changes her likes and dislikes often. So we went a little generic and used them all!
Looking in from her door. She has a queen bed. Not because I think a 4 year old needs a queen, but because that is what we already had. Plus, when guests come, they stay in her room and she sleeps on an air mattress in our room (which she enjoys). But it's really hard to find little girl bedding for a queen!! I didn't necessarily want character bedding, but even if I did it wasn't an option. Since purple is her favorite color, I was trying to go with that, but even that was hard to find. So we went with this fun colorful dot one. It helps incorporate all of the princess colors.
I did a lot of do it yourself in this room to keep the cost down. We also just used a lot of what we already had. The princess pictures are actually from a calendar that I picked up that Target dollar spot. And the frames were a clearance deal that was unbeatable. The whole project only cost about $20! She picked out the 4 princesses she wanted to use.
I used my silhouette and painted this canvas for her. We already had the canvas (because they come in 2 packs and it was leftover from a different project). I saw something similar to this on Pinterest/etsy. I just used vinyl I had, so really this cost me about $3 in paint! Not bad. I tried to use purple with my projects, because most store bought princess stuff I found was pink.
We tried using the canopy over her bed for a few weeks, but she kept getting tangled in it and/or pulling it down. So instead it is over her chair as a reading corner. The double doors are her closet, and the door to the right is her bedroom door open. Behind it is her bow hanger.
She was really into Merida (from Brave) for a while, but there isn't much out there in the way of decor or decorations. So I just made my own. I printed a silhouette off the internet, traced it on to purple paper, and cut the letters out of vinyl with my silhouette. The frame is one we already have. Cheap, but cute!
Ariel is still her favorite, so I painted this piece of wood. I added the quote using vinyl. The little decorations came from JoAnn's. Except the fork dinglehopper. It's actually leftover from her first birthday. ;)
This Ariel picture is actually just a piece of scrapbook paper. It came on a 12 by 12 sheet, but the rest of the page was just blue. I cut out the part I wanted and threw it in an IKEA frame.
Both of the kids have pretty big closets. We had her dress up holder in her room, but once she got her doll house we had to move it to the closet. It still gets a lot of use! I'm using her shelf for our craft supplies, one bin for outgrown clothes, one big for clearance stuff that she has yet to grow into. There is even a shelf in there with our kid videos. We had to be creative with our storage! Also, I just taped the extra calendar pictures onto the inside of her closet doors.
We don't have a toy room. We don't even have an extra living space like our home in Ohio. But the kids rooms are pretty big, so they have some of their toys in their room. It doesn't look all cute and glamorous, but it works.
The two frames still need pictures, but everything else is pretty much done. A lot of the decor that we did buy came from Hobby Lobby.
So that's it. Olivia loves it. Both kids play in there. It's fun, bright, reflects her interests, and is a space she can call her own. Mission accomplished.


Love it! And you gave me so many ideas. Sadie is still in a toddler bed but she has been asking for a big girl bed for a while so that's what we are doing for her birthday. Although, I have been nervous about shopping for a comforter & you didn't give me much hope!
ReplyDelete